

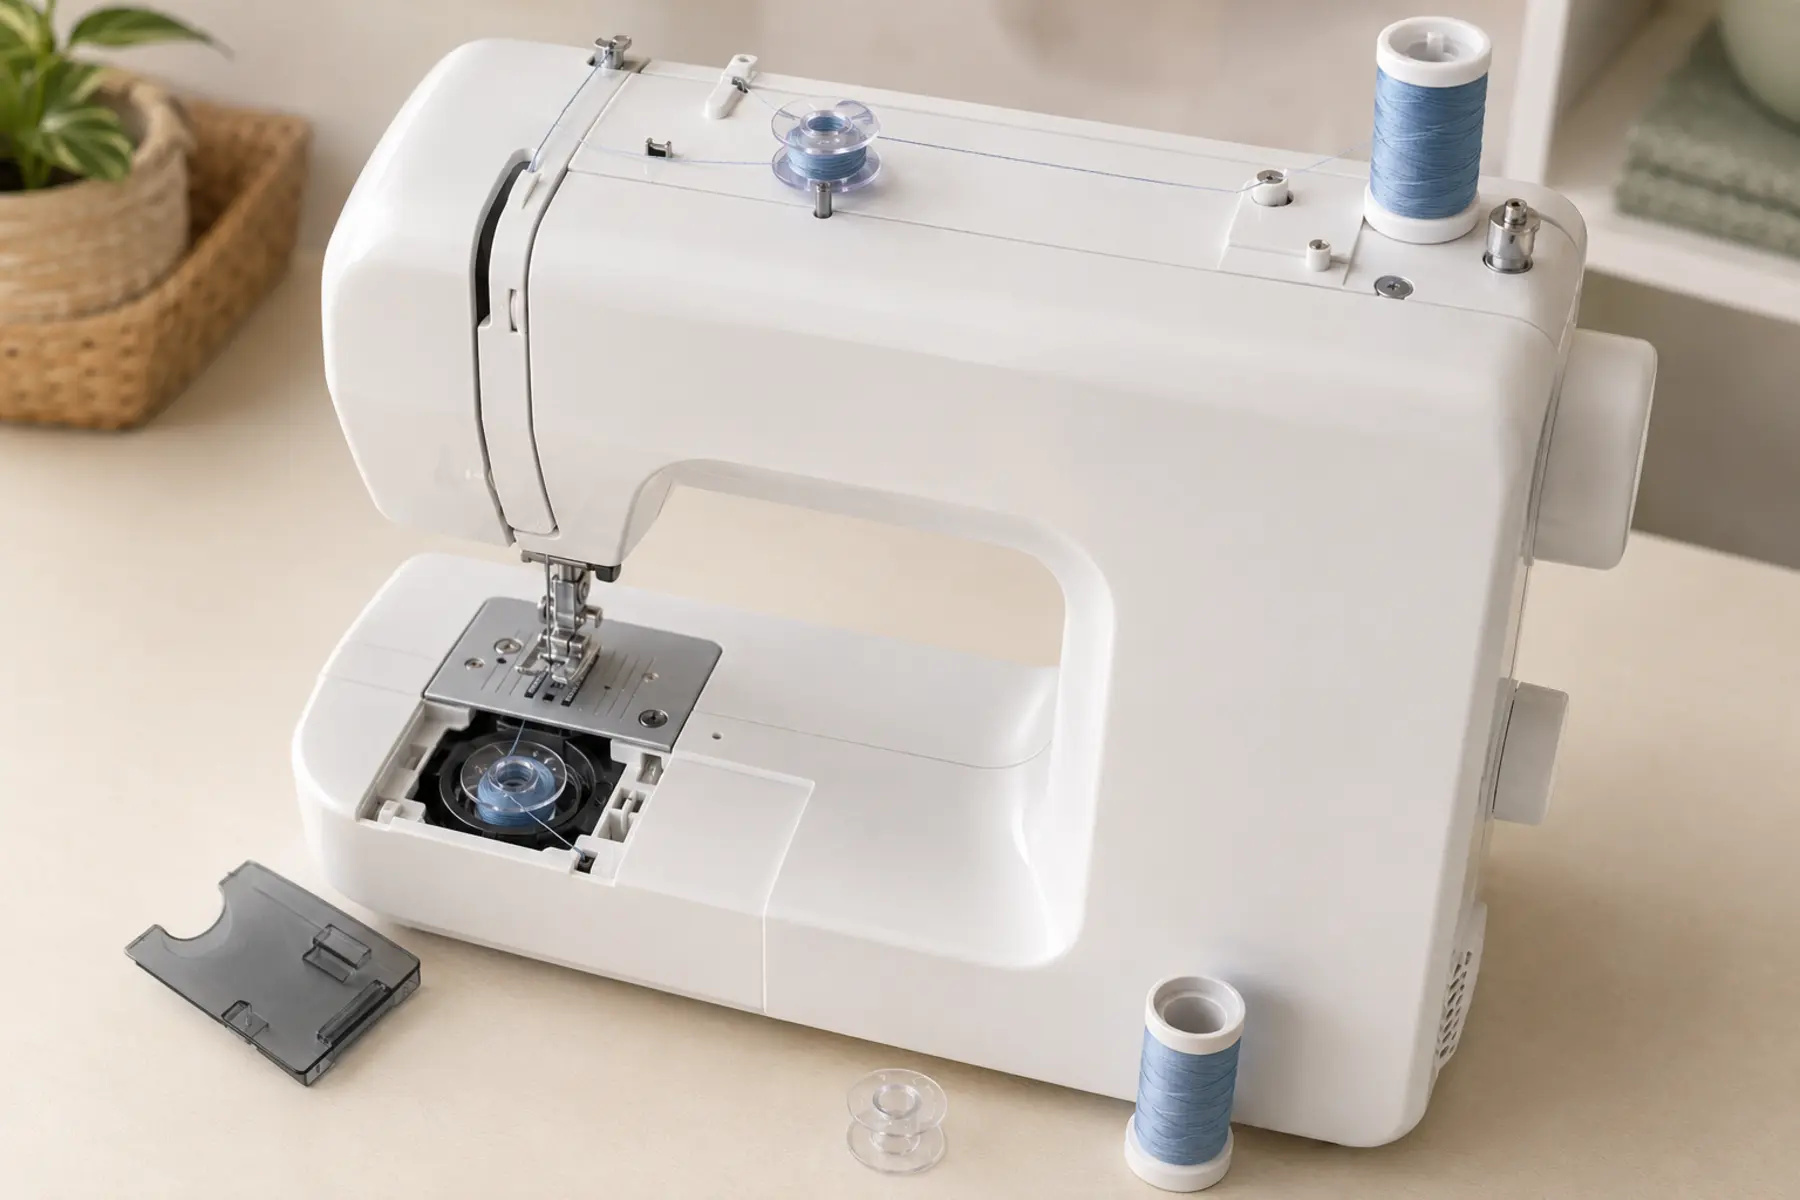
The bobbin is small, but it controls half of every lockstitch. When the bobbin is the wrong type, wound poorly, inserted in the wrong direction, or left outside its tension path, the machine may jam, create loops, break thread, skip stitches, or refuse to form a stitch at all.
The goal is not simply to “put the bobbin in.” The goal is to create a smooth lower-thread supply that works in time with the needle, hook, upper tension system, and feed mechanism. The steps below separate winding problems from insertion problems so you can identify the actual cause instead of adjusting random settings.
1. Identify the exact bobbin your machine requires
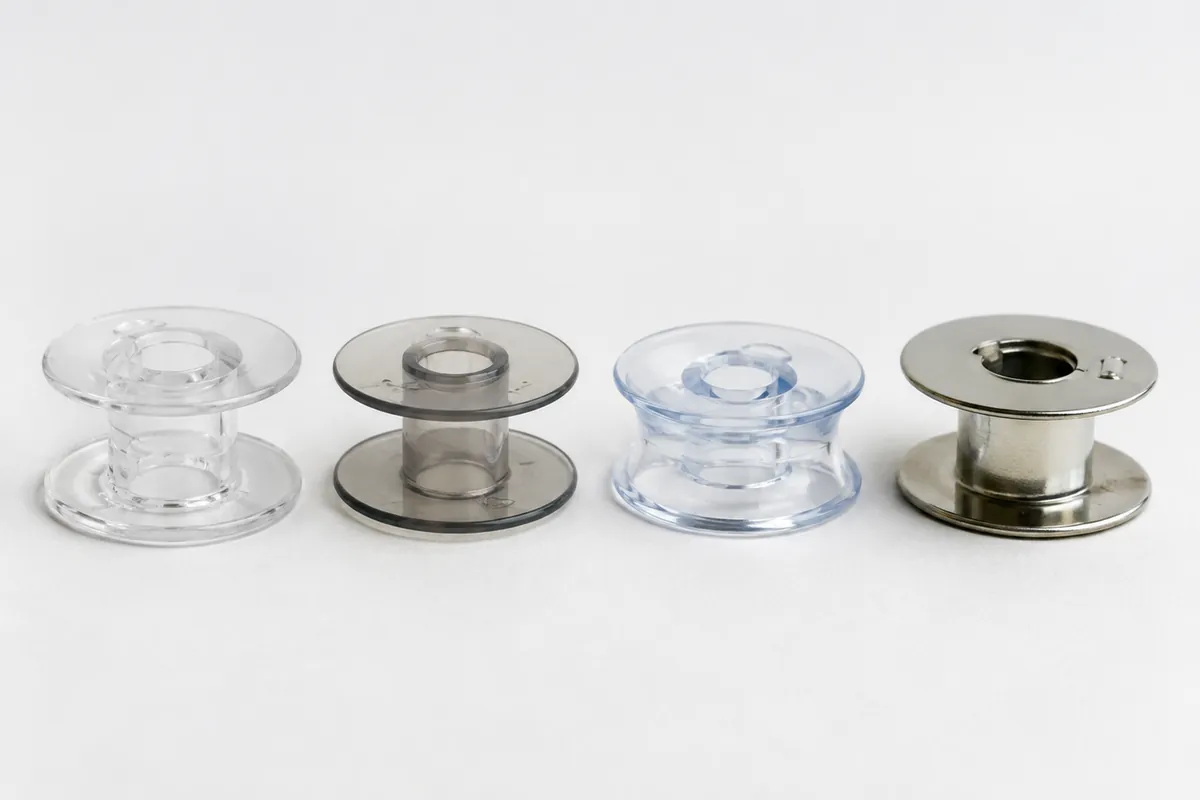
Use the exact machine model number and check the manual, manufacturer parts list, or an original bobbin supplied with the machine. Bobbins are classified by dimensions and shape, not only by how they look from above. Two clear plastic bobbins may appear identical but differ enough in height or curvature to affect tension and hook clearance.
Common domestic bobbin families include Class 15, 15J, 66, L-style, and brand-specific designs, but these names are not interchangeable. Some machines require plastic bobbins because the sensor reads through them. Others allow metal bobbins. A metal bobbin should not replace a plastic one unless the manual explicitly permits it.
Inspect the bobbin before use. Discard or replace bobbins that are cracked, warped, bent, chipped, rough around the edges, or distorted by heat. Remove old thread rather than winding a new layer over a partly filled bobbin unless the machine manual specifically allows it.
After confirming the exact class or part number, you can compare replacement sewing-machine bobbins on Amazon. Match the listing to the manual rather than relying on appearance alone.
2. Prepare the machine for bobbin winding
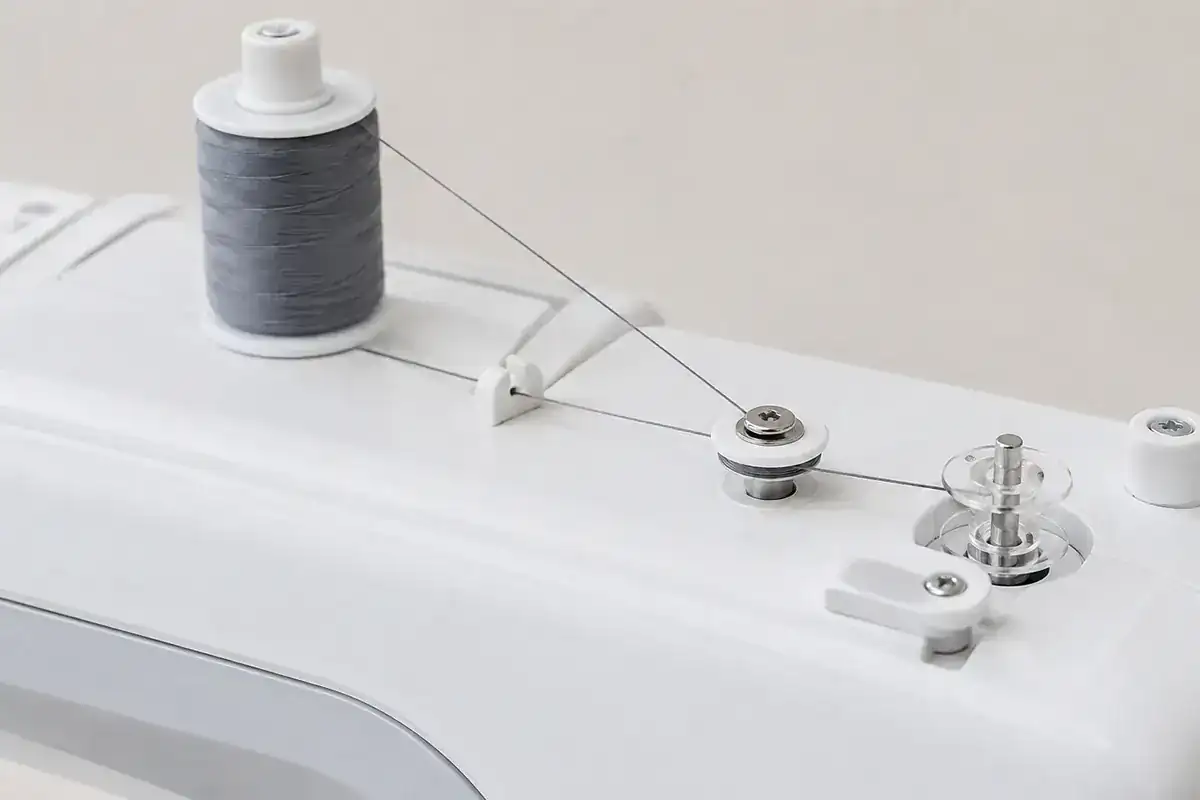
Place the machine on a stable surface and switch it off while installing the spool and empty bobbin. Fit the thread spool on the correct spool pin. For a horizontal spool pin, use a spool cap that holds the spool securely without pressing so tightly that the thread cannot unwind. For a vertical pin, use the felt pad when the manual provides one.
Follow the bobbin-winding path printed on the machine. This path is usually different from the normal upper-threading path. It commonly passes through one or more guides and around a small bobbin-winding tension disc or pre-tension guide before reaching the bobbin.
The winding tension guide is essential. It creates enough resistance to pack the thread evenly. Skipping it often produces a soft, loose, uneven bobbin that can collapse, tangle, or feed inconsistently.
3. Attach the thread to the empty bobbin correctly
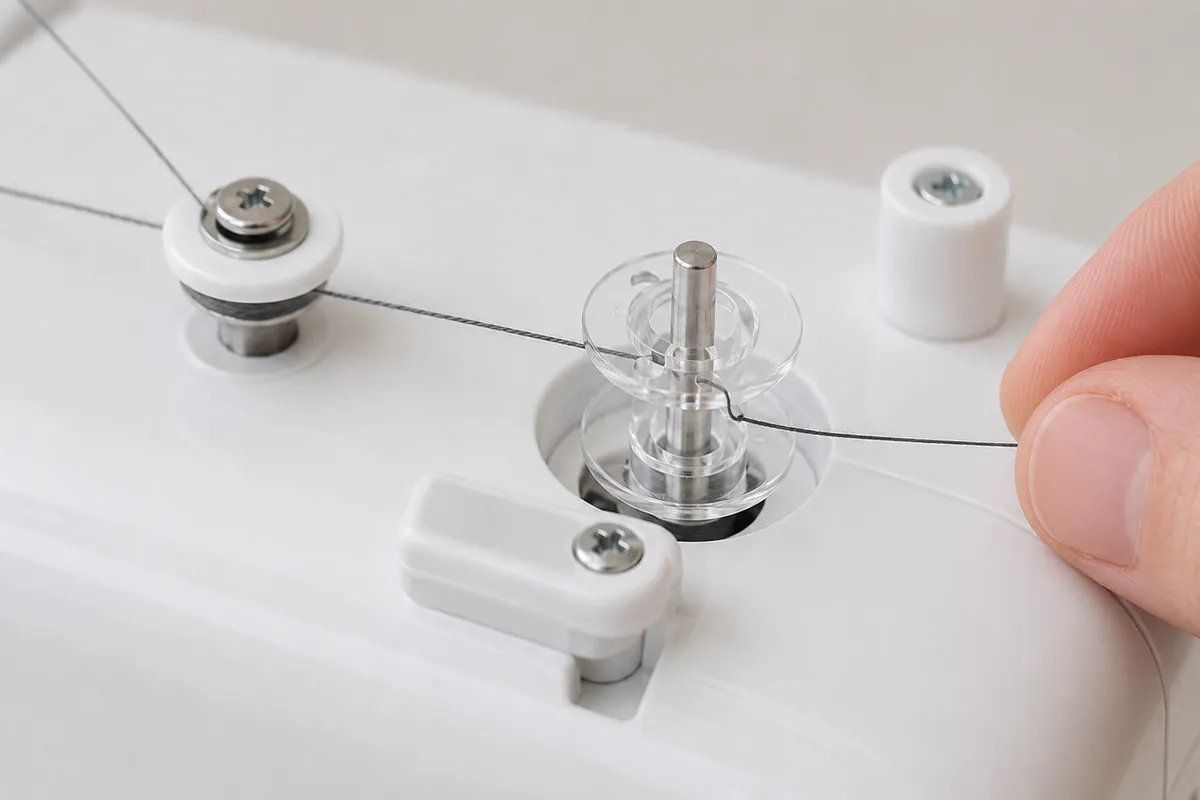
Seat the empty bobbin fully on the bobbin-winder spindle. Some bobbins click into place; others slide down firmly. Align any notch or slot with the spindle when required. A bobbin that sits at an angle may wind unevenly or fail to rotate.
Many bobbins have a small hole in the top flange. Pass the thread from the inside of the bobbin through the hole to the outside, leaving a short tail. Hold the tail while beginning to wind. After several turns, stop the machine and trim the tail close to the bobbin so it cannot become trapped underneath later layers.
Some machines use a built-in cutter and do not require threading through a bobbin hole. Follow the printed diagram or manual rather than combining instructions from a different model.
4. Wind the bobbin evenly
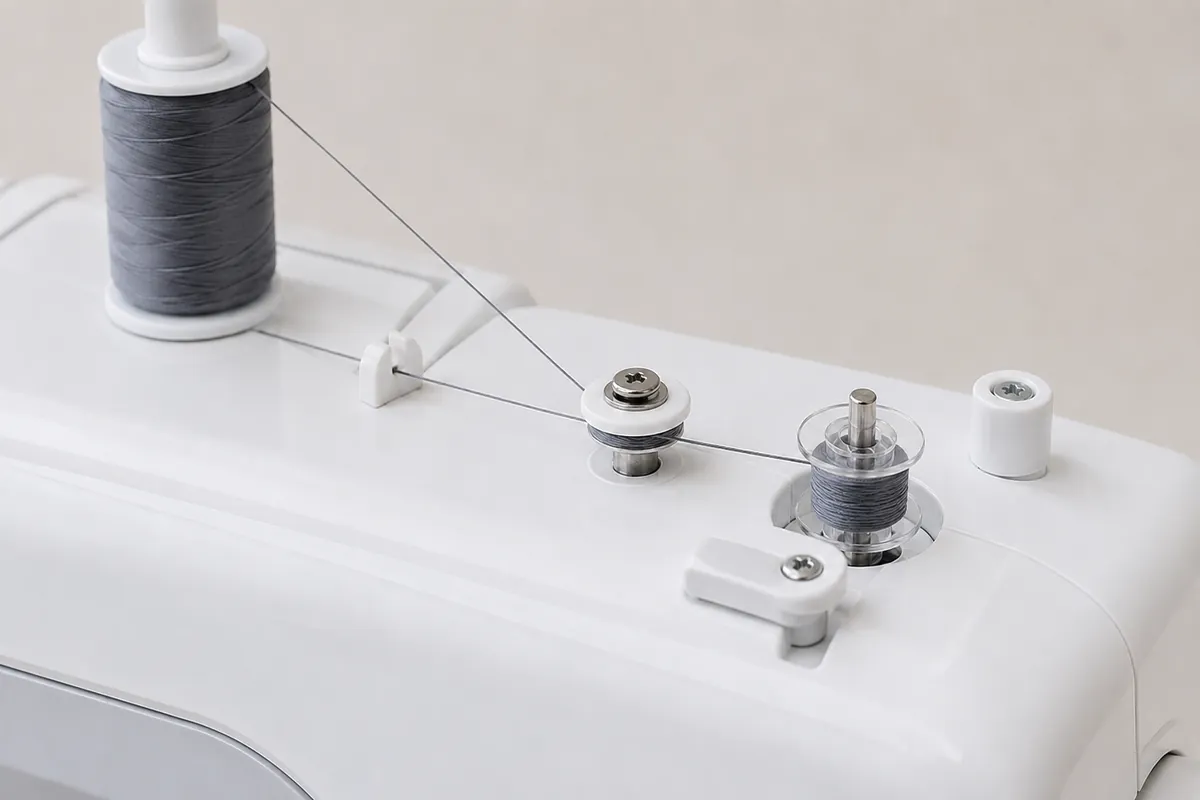
Move the bobbin-winder spindle into the winding position, commonly by sliding it to the right. On computerized machines, the display may confirm winding mode. On some mechanical machines, the handwheel clutch must be released so the needle does not move while the bobbin winds. Modern machines often disengage sewing automatically.
Switch on the machine and press the foot controller gently, or use the start control as directed. Watch the first several layers. The thread should spread evenly across the bobbin rather than piling up at one side. If it immediately forms a cone, stop and check the tension guide, bobbin seating, spool direction, and thread path.
Allow the machine to stop automatically when the bobbin is full. If it does not stop, stop winding before the thread reaches or rises above the bobbin rim. An overfilled bobbin may not sit correctly in the case and can rub against the cover or hook area.
5. Fix uneven, loose, or lopsided bobbin winding
The thread piles up on one side
Stop winding and confirm that the thread is correctly seated in the bobbin-winding tension guide. Check that the bobbin is fully pushed onto the spindle and that it is the correct type. Do not guide the thread aggressively with your fingers because this can create inconsistent packing or pull the thread out of the guide.
The bobbin feels soft or spongy
Loose winding usually means there was not enough tension during winding. Remove the thread and rewind from empty. A soft bobbin can compress during sewing, allowing layers to shift and create sudden changes in lower-thread delivery.
The thread keeps breaking while winding
Check for a missed guide, a rough bobbin edge, an incorrectly fitted spool cap, old thread, or excessive speed. Also inspect the bobbin-winding tension guide for a snag.
The bobbin does not rotate
Confirm that the winder spindle is in winding mode, the bobbin is correctly seated, and any handwheel clutch is set as the manual requires. A machine that will not sew afterward may simply still be left in bobbin-winding mode.
6. Remove and inspect the wound bobbin
Stop the machine, move the spindle back to the sewing position, and cut the thread using the machine cutter or scissors. Remove the bobbin without pulling forcefully against the spindle.
Inspect both sides. The thread should be level and evenly packed. If one side is visibly higher, if loops cross the rim, or if the bobbin is overfilled, unwind it and correct the winding setup. Do not expect the bobbin case to compensate for poor winding.
7. Insert a top-loading or drop-in bobbin
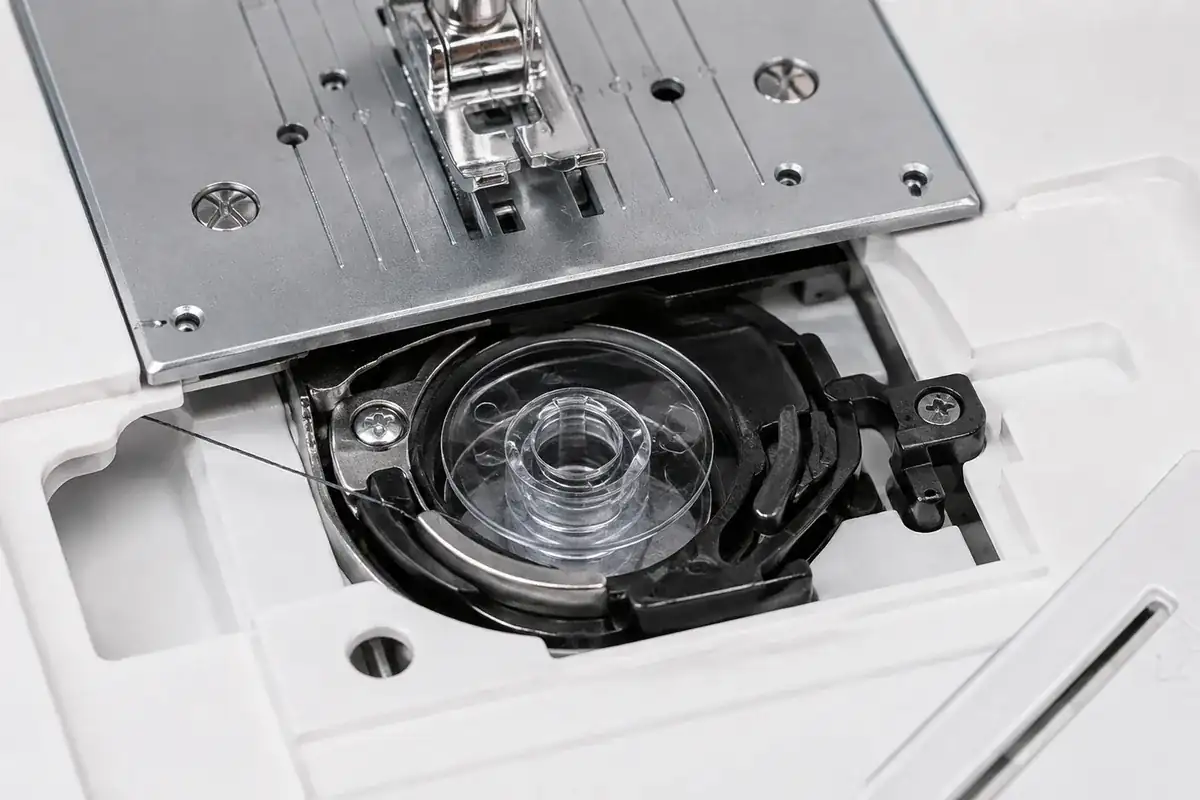
Switch off the machine and raise the needle to its highest position. Lift the presser foot. Remove the clear bobbin cover or slide plate according to the manual.
Hold the bobbin so the thread unwinds in the direction shown by the arrows near the bobbin area. The correct direction may be clockwise on one machine and counterclockwise on another. Place the bobbin flat in the holder without forcing it.
Guide the thread into the first slot, around the channel, and under the bobbin-case tension spring exactly as the printed arrows indicate. Pulling the thread through the slot should create light, controlled resistance. On quick-set bobbin systems, continue the thread through the cutter path and trim it as directed.
Replace the cover securely. The bobbin should remain flat and should not jump when the thread is pulled gently.
8. Insert a front-loading bobbin into a removable bobbin case
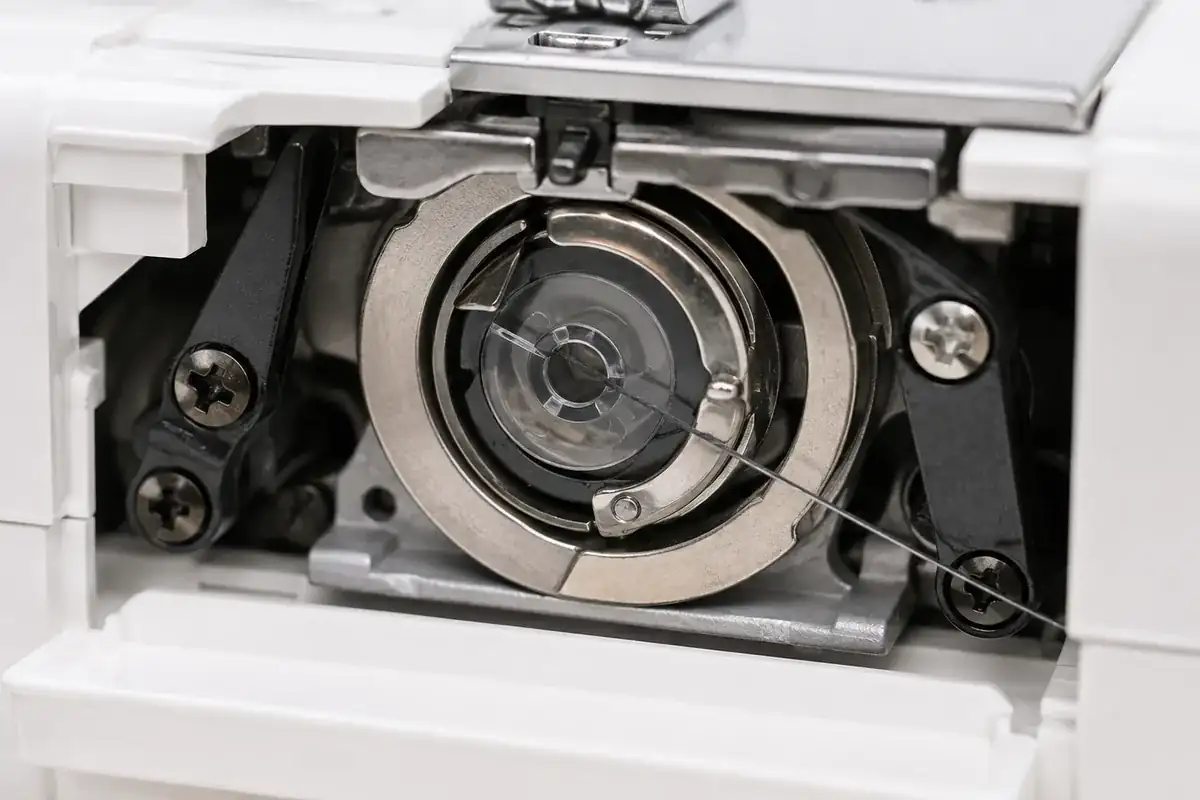
Raise the needle fully and open the shuttle cover. Remove the bobbin case by holding its latch. Place the bobbin into the case in the direction shown in the manual.
Pull the thread through the slot in the case and underneath the tension spring until it exits through the delivery opening. Leave a thread tail of the length recommended by the manual. When the thread is seated correctly, it should move with light resistance rather than falling freely out of the case.
Hold the latch and insert the bobbin case onto the centre post or hook assembly. Align the positioning finger with its notch. Push until the case seats fully, then release the latch. A partly inserted case may wobble, jam, or prevent the hook from rotating correctly.
9. Bring up the bobbin thread when the machine requires it
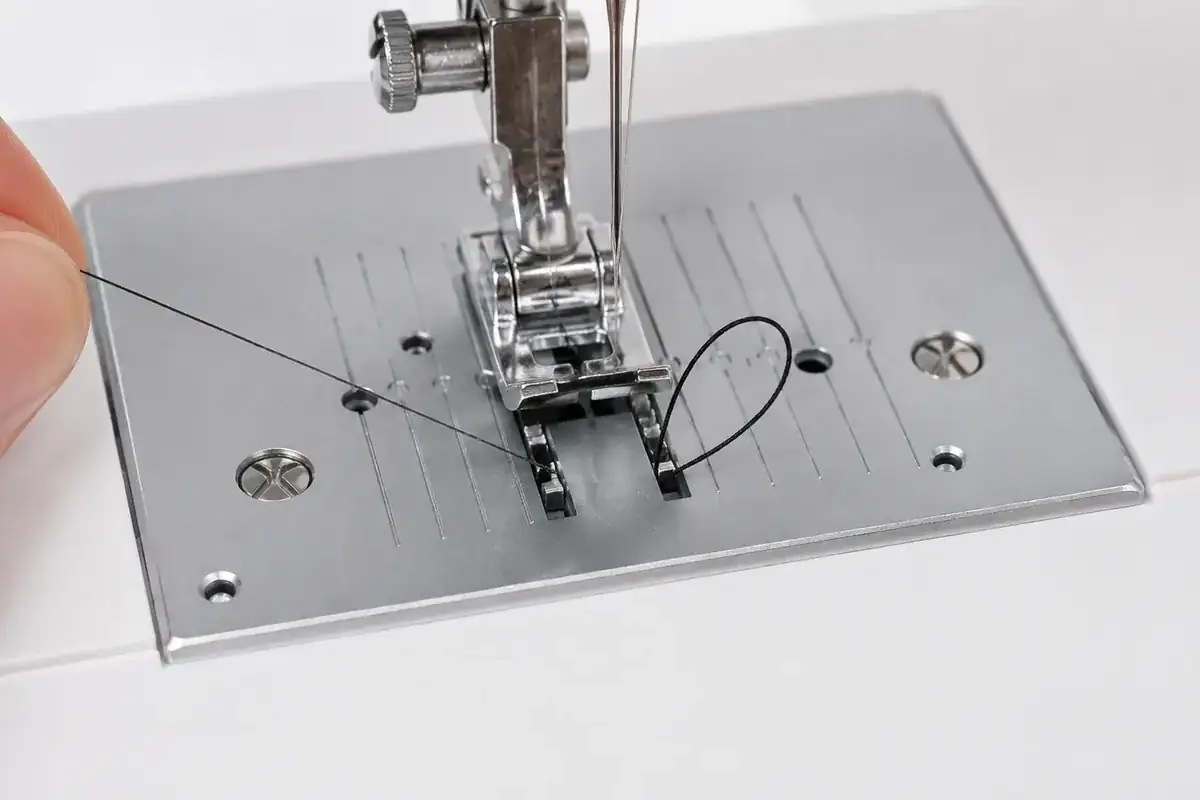
Hold the upper-thread tail gently with your left hand. Turn the handwheel toward you through one complete needle cycle. The needle will descend and rise, carrying a loop of bobbin thread through the needle plate.
Pull the upper-thread tail until the bobbin-thread loop appears. Use a small tool or the thread tail to draw the loop fully upward. Place both thread tails under the presser foot and toward the back of the machine.
Some drop-in systems do not require manually bringing up the bobbin thread because the quick-set path trims and positions it automatically. Follow the model instructions. Do not pull apart covers or mechanisms simply because another machine uses a different method.
10. Test the bobbin setup before sewing the project
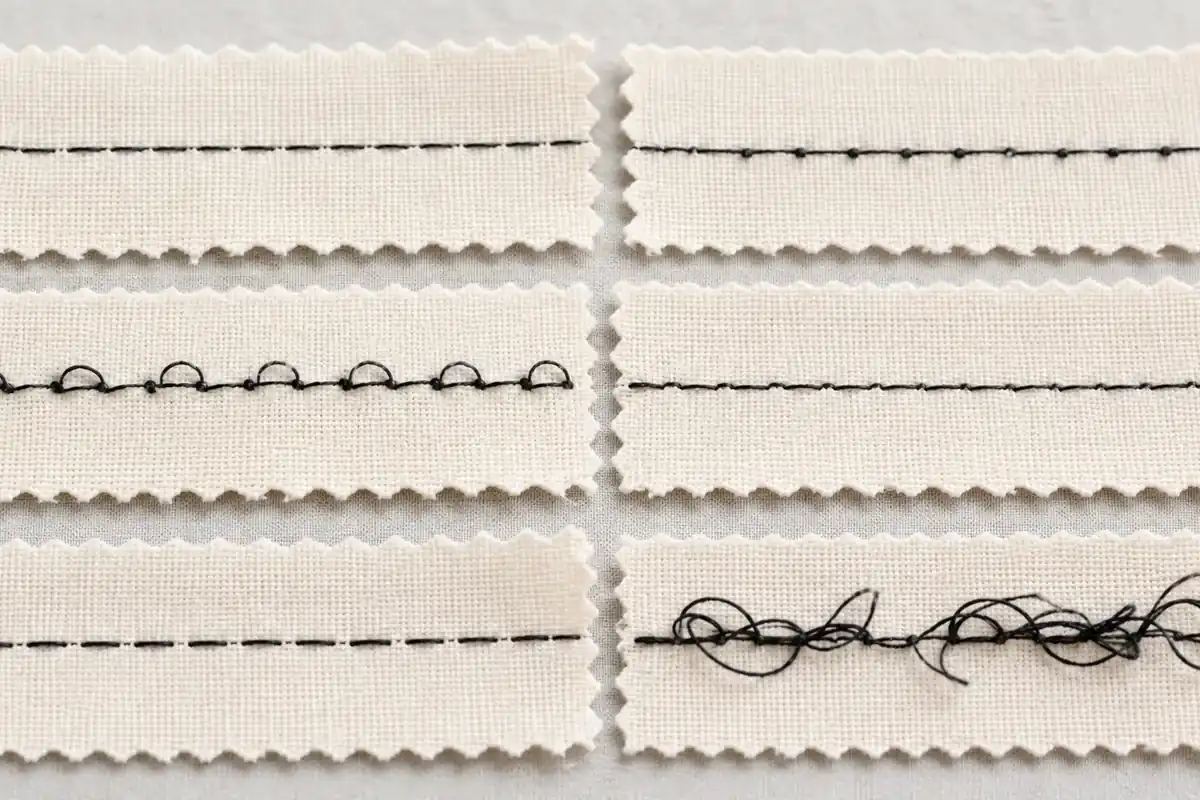
Install a fresh appropriate needle, thread the upper path with the presser foot raised, select a basic straight stitch, and use two layers of stable woven scrap fabric. Lower the presser foot and sew slowly.
Examine both sides of the seam. The upper and lower threads should lock within the fabric layers. Large loops on top usually direct attention to the bobbin setup. Large loops underneath usually direct attention to the upper-thread path. This distinction is useful, but recheck both paths because one fault can create several symptoms.
Do not adjust bobbin-case tension until the correct bobbin, winding quality, insertion direction, tension slot, upper threading, and needle have all been confirmed.
11. Diagnose common bobbin problems by symptom
12. Understand bobbin tension without adjusting it unnecessarily
The bobbin-case tension spring controls resistance on the lower thread. In many domestic machines, this tension is factory set for general sewing and rarely needs routine adjustment.
A tension screw is not a general troubleshooting dial. A tiny movement can create a significant change, and the original setting can be difficult to restore. Before touching it, rule out the wrong bobbin, poor winding, incorrect insertion, missed slot, lint under the spring, damaged thread, unsuitable needle, and upper-threading errors.
Specialty techniques may use a separate bobbin case adjusted for decorative bobbin work or unusual threads. Keeping a separate case preserves the normal factory setting.
13. Clean the bobbin area safely
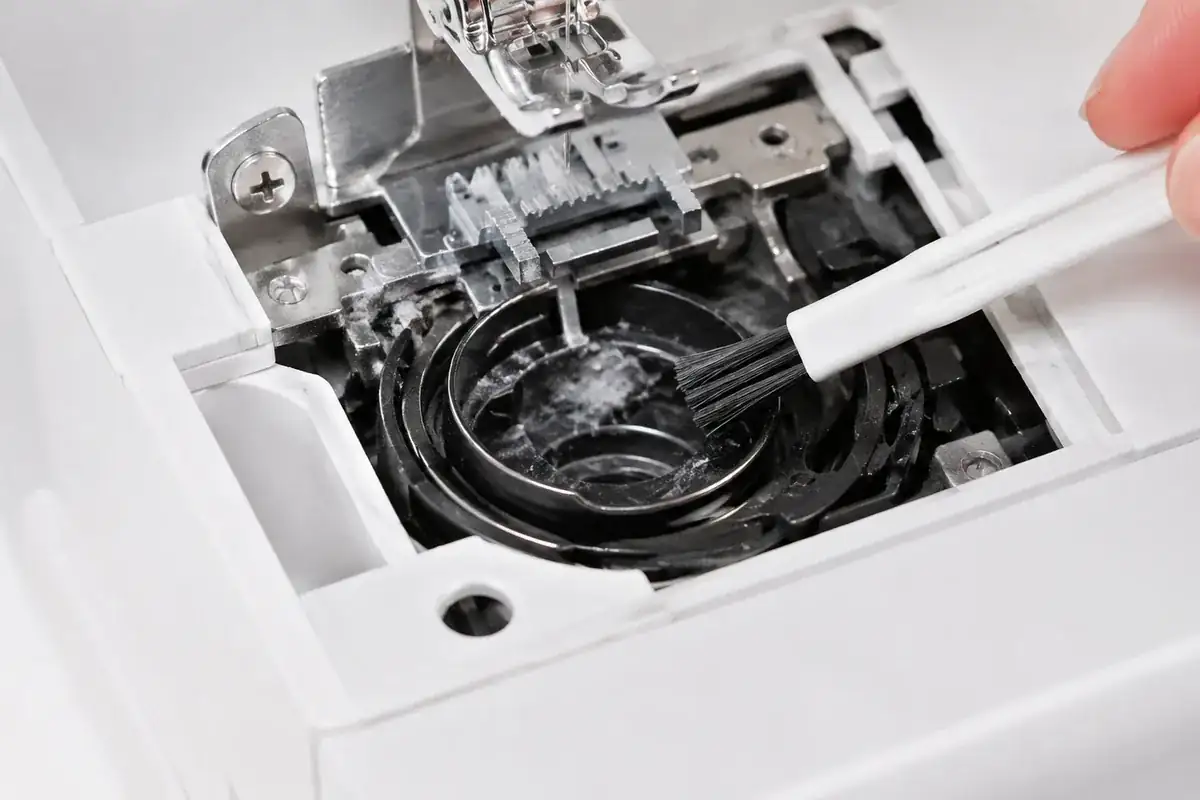
Switch off and unplug the machine. Remove the needle, presser foot, bobbin, and needle plate only as instructed by the manual. Brush lint from the bobbin holder, feed dogs, hook race, and removable case.
Do not blow lint deeper into the machine. Do not scratch the plastic bobbin holder with a screwdriver or metal tool. Do not add oil unless the manufacturer identifies a user-oiling point.
Inspect for thread wrapped around the hook, rough needle strikes on the case, burrs, cracks, or a holder that no longer sits flat. Damage in this area can require professional service.
14. Complete bobbin setup checklist
The bobbin is the exact type specified for the model
The bobbin is empty, undamaged, and fully seated on the winder
The thread passes through the bobbin-winding tension guide
The bobbin is wound evenly and below the rim
The winder spindle or clutch is returned to sewing mode
The bobbin unwinds in the model-specific direction
The thread is seated under the bobbin tension spring
The bobbin case or cover is fully secured
The bobbin area is free of lint and tangled thread
The machine is tested on two layers of scrap fabric
Frequently Asked Questions
Bobbin winding and insertion questions
How do I know which bobbin my sewing machine uses?
Check the exact model manual or manufacturer parts list. Bobbins that look similar can differ in height, diameter, curvature, material, and class, so appearance alone is not reliable.
Why is my bobbin winding unevenly?
Uneven winding is usually caused by missing the bobbin-winding tension guide, holding the thread incorrectly at the start, using the wrong bobbin, or a bobbin that is not fully seated on the winder spindle.
Which direction should the bobbin turn when inserted?
The correct direction is model-specific. Follow the arrows on the bobbin cover, bobbin case, or manual. Do not assume clockwise or counterclockwise based on another machine.
Why is the thread looping on top of the fabric?
Loops on top often indicate a lower-thread problem, such as a bobbin inserted in the wrong direction, thread missing the bobbin-case tension slot, or an incorrectly seated bobbin case.
Should I adjust the bobbin-case tension screw?
Not as a first step. Confirm the correct bobbin, winding quality, insertion direction, thread path, upper threading, needle condition, and test fabric before changing bobbin tension.
A reliable bobbin setup removes half the guesswork
Good bobbin performance begins before the bobbin reaches the machine. Use the correct bobbin, wind it through the proper tension guide, stop below the rim, insert it in the exact model-specific direction, and seat the thread under the lower tension spring.
When a problem appears, separate winding quality from insertion, tension path, upper threading, and needle condition. That method is faster and safer than changing tension screws or forcing the bobbin case.